Cloud Deploy for Cloud Run: A Practical Guide

Cloud Deploy for Cloud Run: A Practical Guide
This article aims to demystify Cloud Deploy by implementing a practical deployment pipeline for Cloud Run. Since Cloud Deploy was initially released for Kubernetes, learning it solely for Cloud Run can feel overwhelming. This guide focuses on the essentials for building and operating a production-ready Cloud Run deployment pipeline, covering:
- Cloud Deploy mechanics
- Designing and implementing a deployment pipeline with Cloud Deploy
- Service Account and IAM design
- Recommended Infra as Code approach
- Tips for writing an effective skaffold.yaml
Advanced features like automation, deployment hooks, and canary deployments can be readily applied once you grasp these fundamentals, so they won’t be covered here.
This article is geared towards those already using Cloud Run but haven’t adopted Cloud Deploy. While Kubernetes knowledge isn’t mandatory, the following is assumed:
- Familiarity with Google Cloud (gcloud CLI, projects, IAM, Service Accounts, Cloud Run, Cloud Build, Cloud Storage, Artifact Registry)
- Docker and container basics
- Terraform
disclaimer
Just a heads up, the recommendations and best practices shared here are based on my own experiences and thoughts through actual deployment adventures. They’re not the official word from Google Cloud. Also, I’ve simplified some explanations to keep things clear and digestible.
What is Cloud Deploy?
Overview
Cloud Deploy is a fully managed service for managing and automating deployment pipelines across different environments, such as “development → staging → production”. These pipelines are called Delivery Pipelines in Cloud Deploy terminology.
For a deeper understanding of Cloud Deploy’s capabilities and benefits, check out this video:
Delivery Pipeline Examples
Cloud Deploy enables you to implement various Delivery Pipelines, including:
Serial Deployment
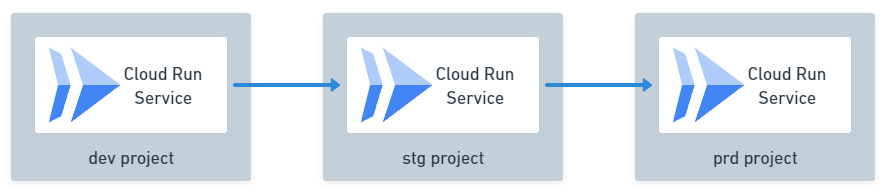
This simple pipeline deploys a single Cloud Run service app sequentially through dev, stg, and prd environments.
Parallel Deployment
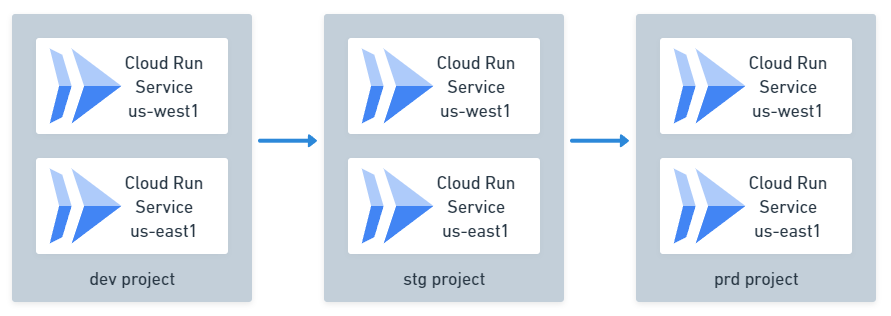
This pipeline deploys multiple Cloud Run service apps to each environment sequentially, but deploys multiple apps simultaneously within each environment. For example, you can deploy the same app to multiple regions at once using a single Delivery Pipeline.
Canary Deployment
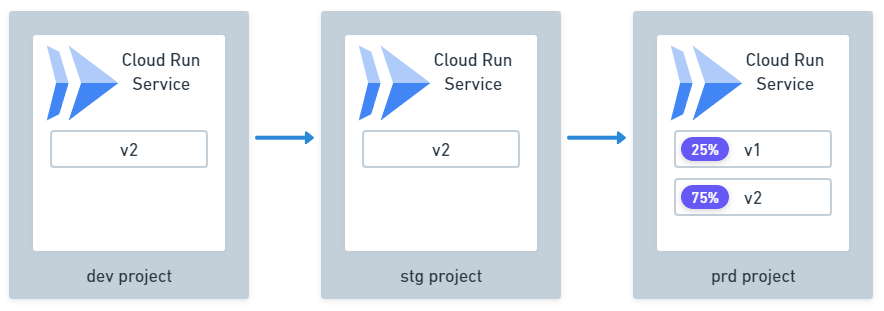
Cloud Deploy also supports canary deployments.
Cloud Deploy Architecture and Deployment Flow
To build Delivery Pipelines effectively, it’s crucial to understand Cloud Deploy’s architecture and deployment process.
Skaffold
First, let’s address Skaffold, which often confuses Cloud Deploy newcomers.
Cloud Deploy leverages Skaffold, an open-source tool, for deployments. While Skaffold is a powerful Kubernetes development tool with a steep learning curve, for Cloud Run deployments, you can initially understand it as follows:
Skaffold, guided by the skaffold.yaml configuration file, performs these tasks:
- Builds container images and pushes them to Artifact Registry
- Renders the Cloud Run service YAML (
manifest.yaml) based on the built image - Deploys the rendered
manifest.yamlto the Cloud Run service
Cloud Deploy Architecture
A Cloud Deploy Delivery Pipeline consists of a Delivery Pipeline and multiple associated Targets.
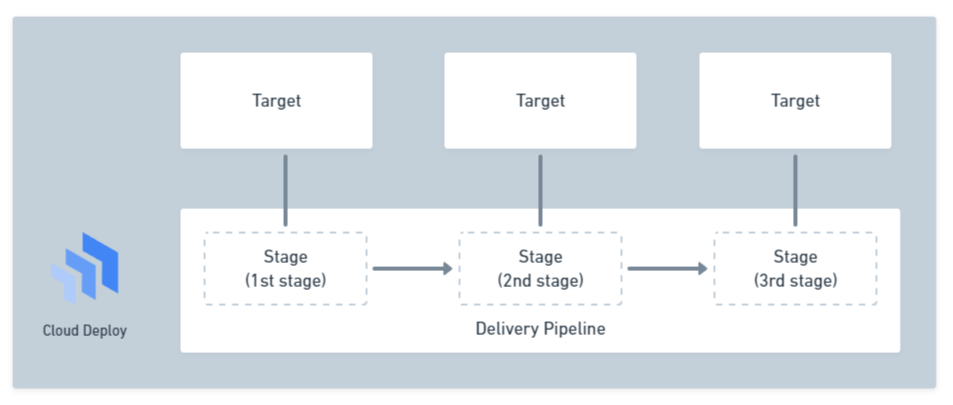
The Delivery Pipeline is the core resource, defining what and in what order things are deployed. The order is defined using the concept of Stages. For example, if you have dev, stg, and prd environments, you define a stage for each. Each Stage is then associated with one or more Targets.
A Target represents the deployment destination. For Cloud Run, it defines the project and location where the service is deployed.
Here’s how Delivery Pipeline and Target are configured in Terraform:
resource "google_clouddeploy_target" "hello-app-dev" {  name = "hello-app-dev"  run {    location = "projects/hello-app-dev/locations/us-west1"  }}
resource "google_clouddeploy_target" "hello-app-stg" {  name = "hello-app-stg"  run {    location = "projects/hello-app-stg/locations/us-west1"  }}
resource "google_clouddeploy_target" "hello-app-prd" {  name = "hello-app-prd"  run {    location = "projects/hello-app-prd/locations/us-west1"  }}
resource "google_clouddeploy_delivery_pipeline" "delivery-pipeline" {  name = "hello-app-pipeline"  serial_pipeline {    stages { target_id = google_clouddeploy_target.hello-app-dev.id }    stages { target_id = google_clouddeploy_target.hello-app-stg.id }    stages { target_id = google_clouddeploy_target.hello-app-prd.id }  }}
Deployment Flow
Overall Picture
A typical Cloud Deploy deployment involves these main steps:
- Preparation: Build the container image
- Release Creation: Associate the built image with a Cloud Deploy Release resource
- For each Stage:
- Promote: Deploy the image to the next Stage
Preparation
Cloud Deploy focuses solely on deployment, so tasks like building the container image need to be handled beforehand. Specifically, you need to run the skaffold build command.
This command instructs Skaffold to build and push the container image according to the skaffold.yaml configuration, and outputs the results to artifacts.json:
skaffold build \ --filename skaffold.yaml \ --default-repo us-west1-docker.pkg.dev/hello-app-pipeline/my-app \ --file-output artifacts.jsonThe artifacts.json file contains information about the built image. Cloud Deploy treats this information as a deployment unit, ensuring the same artifact is deployed to each environment.
{ "builds": [ { "imageName": "hello-app", "tag": "us-west1-docker.pkg.dev/hello-app-pipeline/hello-app/hello-app:v1.0.0@sha256:6e0fea340f0db7af620de12a2e121231ed497adc4903cf2a920fed497fc06e5b" } ]}Release Creation
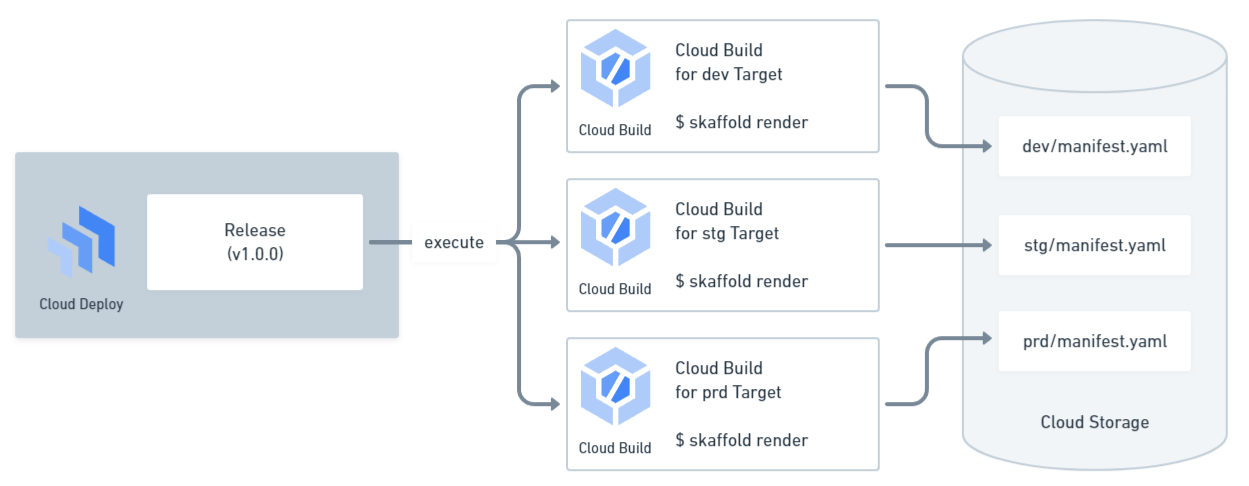
Deployments in Cloud Deploy start by creating a Release resource. This Release associates the pre-built container image with the Delivery Pipeline, enabling its deployment to the Cloud Run service. Besides the image information, the Release also stores the Cloud Storage URI containing the source (skaffold.yaml and templates of manifest.yaml) for rendering the manifest.yaml.

Use gcloud to create a Release like this:
gcloud deploy releases create v-1-0-0 \ --region us-west1 \ --delivery-pipeline hello-app \ --gcs-source-staging-dir gs://hello-app-pipeline/hello-app/source \ --build-artifacts artifacts.json \ --skaffold-file skaffold.yaml \ --source .Upon creation, the Release also renders the manifest.yaml for all Targets and stores them in Cloud Storage. This involves triggering Cloud Build for each Target to execute the skaffold render command.
Promote
After creating the Release, you “Promote” it to actually deploy it to the next Stage.
Interestingly, while “promote” is a commonly used term in Cloud Deploy, there’s no API action called “promote”. The actual process involves creating a Rollout resource.
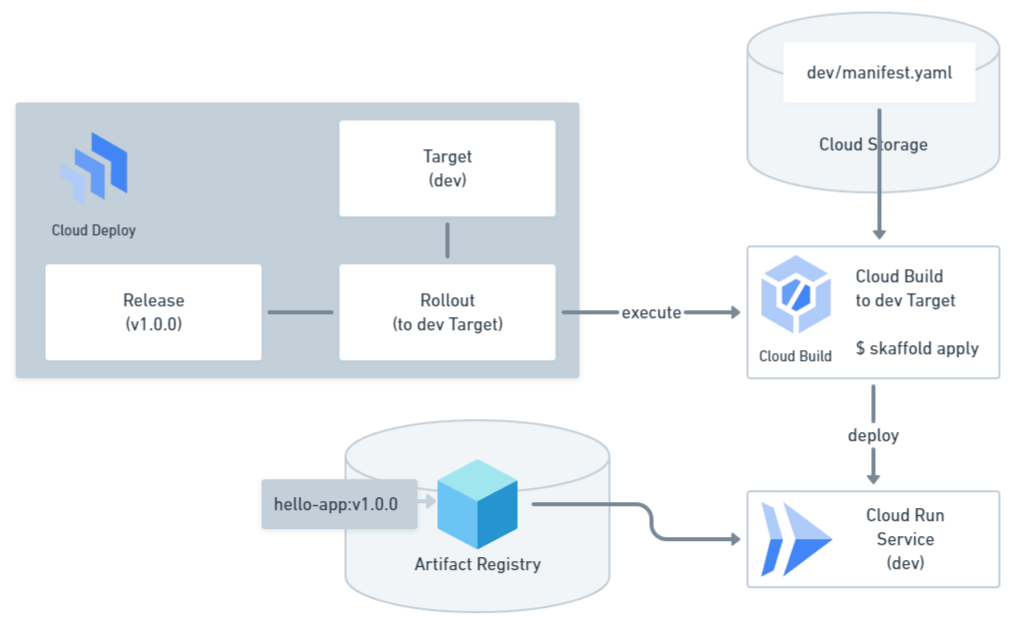
A Rollout links a Release to a Target. When a Rollout is created, Cloud Deploy triggers Cloud Build to deploy the rendered manifest.yaml to the Target using the skaffold apply command.
Therefore, to “promote” generally means “to create a Rollout for the target Release, associated with the Target pointed to by the next Stage”. Here’s how to promote using gcloud:
gcloud deploy releases promote \ --release v-1-0-0 \ --delivery-pipeline hello-app \ --region us-west11Creating the Rollout for the first Stage often happens simultaneously with Release creation, which is the behavior you see in the console and with gcloud deploy releases create. This means that for a dev → stg → prd Delivery Pipeline, deploying to the dev environment occurs automatically upon Release creation.
Additional Notes on Rollouts
Technically, there are additional concepts like Phases and Jobs between Rollouts and Cloud Build. While not crucial for simple Delivery Pipelines, understanding Phases becomes important for canary deployments, and Jobs come into play when using deployment hooks.
Additional Notes on Promotion
Promotion essentially boils down to creating a Rollout for a specific
Target. Understanding this reveals that deployments don’t necessarily have
to follow the dev → stg → prd sequence. For example, using the
--disable-initial-rollout flag with gcloud deploy releases create
allows creating a Release without a dev Rollout. Then, you can directly
deploy to the prd environment by using the --to-target flag with gcloud deploy releases promote. This can be useful for hotfixes in production.
Summary
Here’s a summary of the deployment flow in a dev → stg → prd pipeline using Cloud Deploy:
- Preparation
- Build and push the container image to Artifact Registry using
skaffold build - Obtain the
artifacts.jsonfile containing build information
- Release Creation
- Create a Release using the
gcloud deploy releases createcommand or similar - The Release renders the
manifest.yamlfor each Target usingskaffold renderand stores them in Cloud Storage - A Rollout for the dev environment is automatically created
- The Rollout deploys the dev-specific
manifest.yamlto the dev environment usingskaffold apply
- Promote to stg environment
- Promote using the
gcloud deploy releases promotecommand or similar - A Rollout for the stg environment is created
- The Rollout deploys the stg-specific
manifest.yamlto the stg environment usingskaffold apply
- Promote to prd environment
- Promote using the
gcloud deploy releases promotecommand or similar - A Rollout for the prd environment is created
- The Rollout deploys the prd-specific
manifest.yamlto the prd environment usingskaffold apply
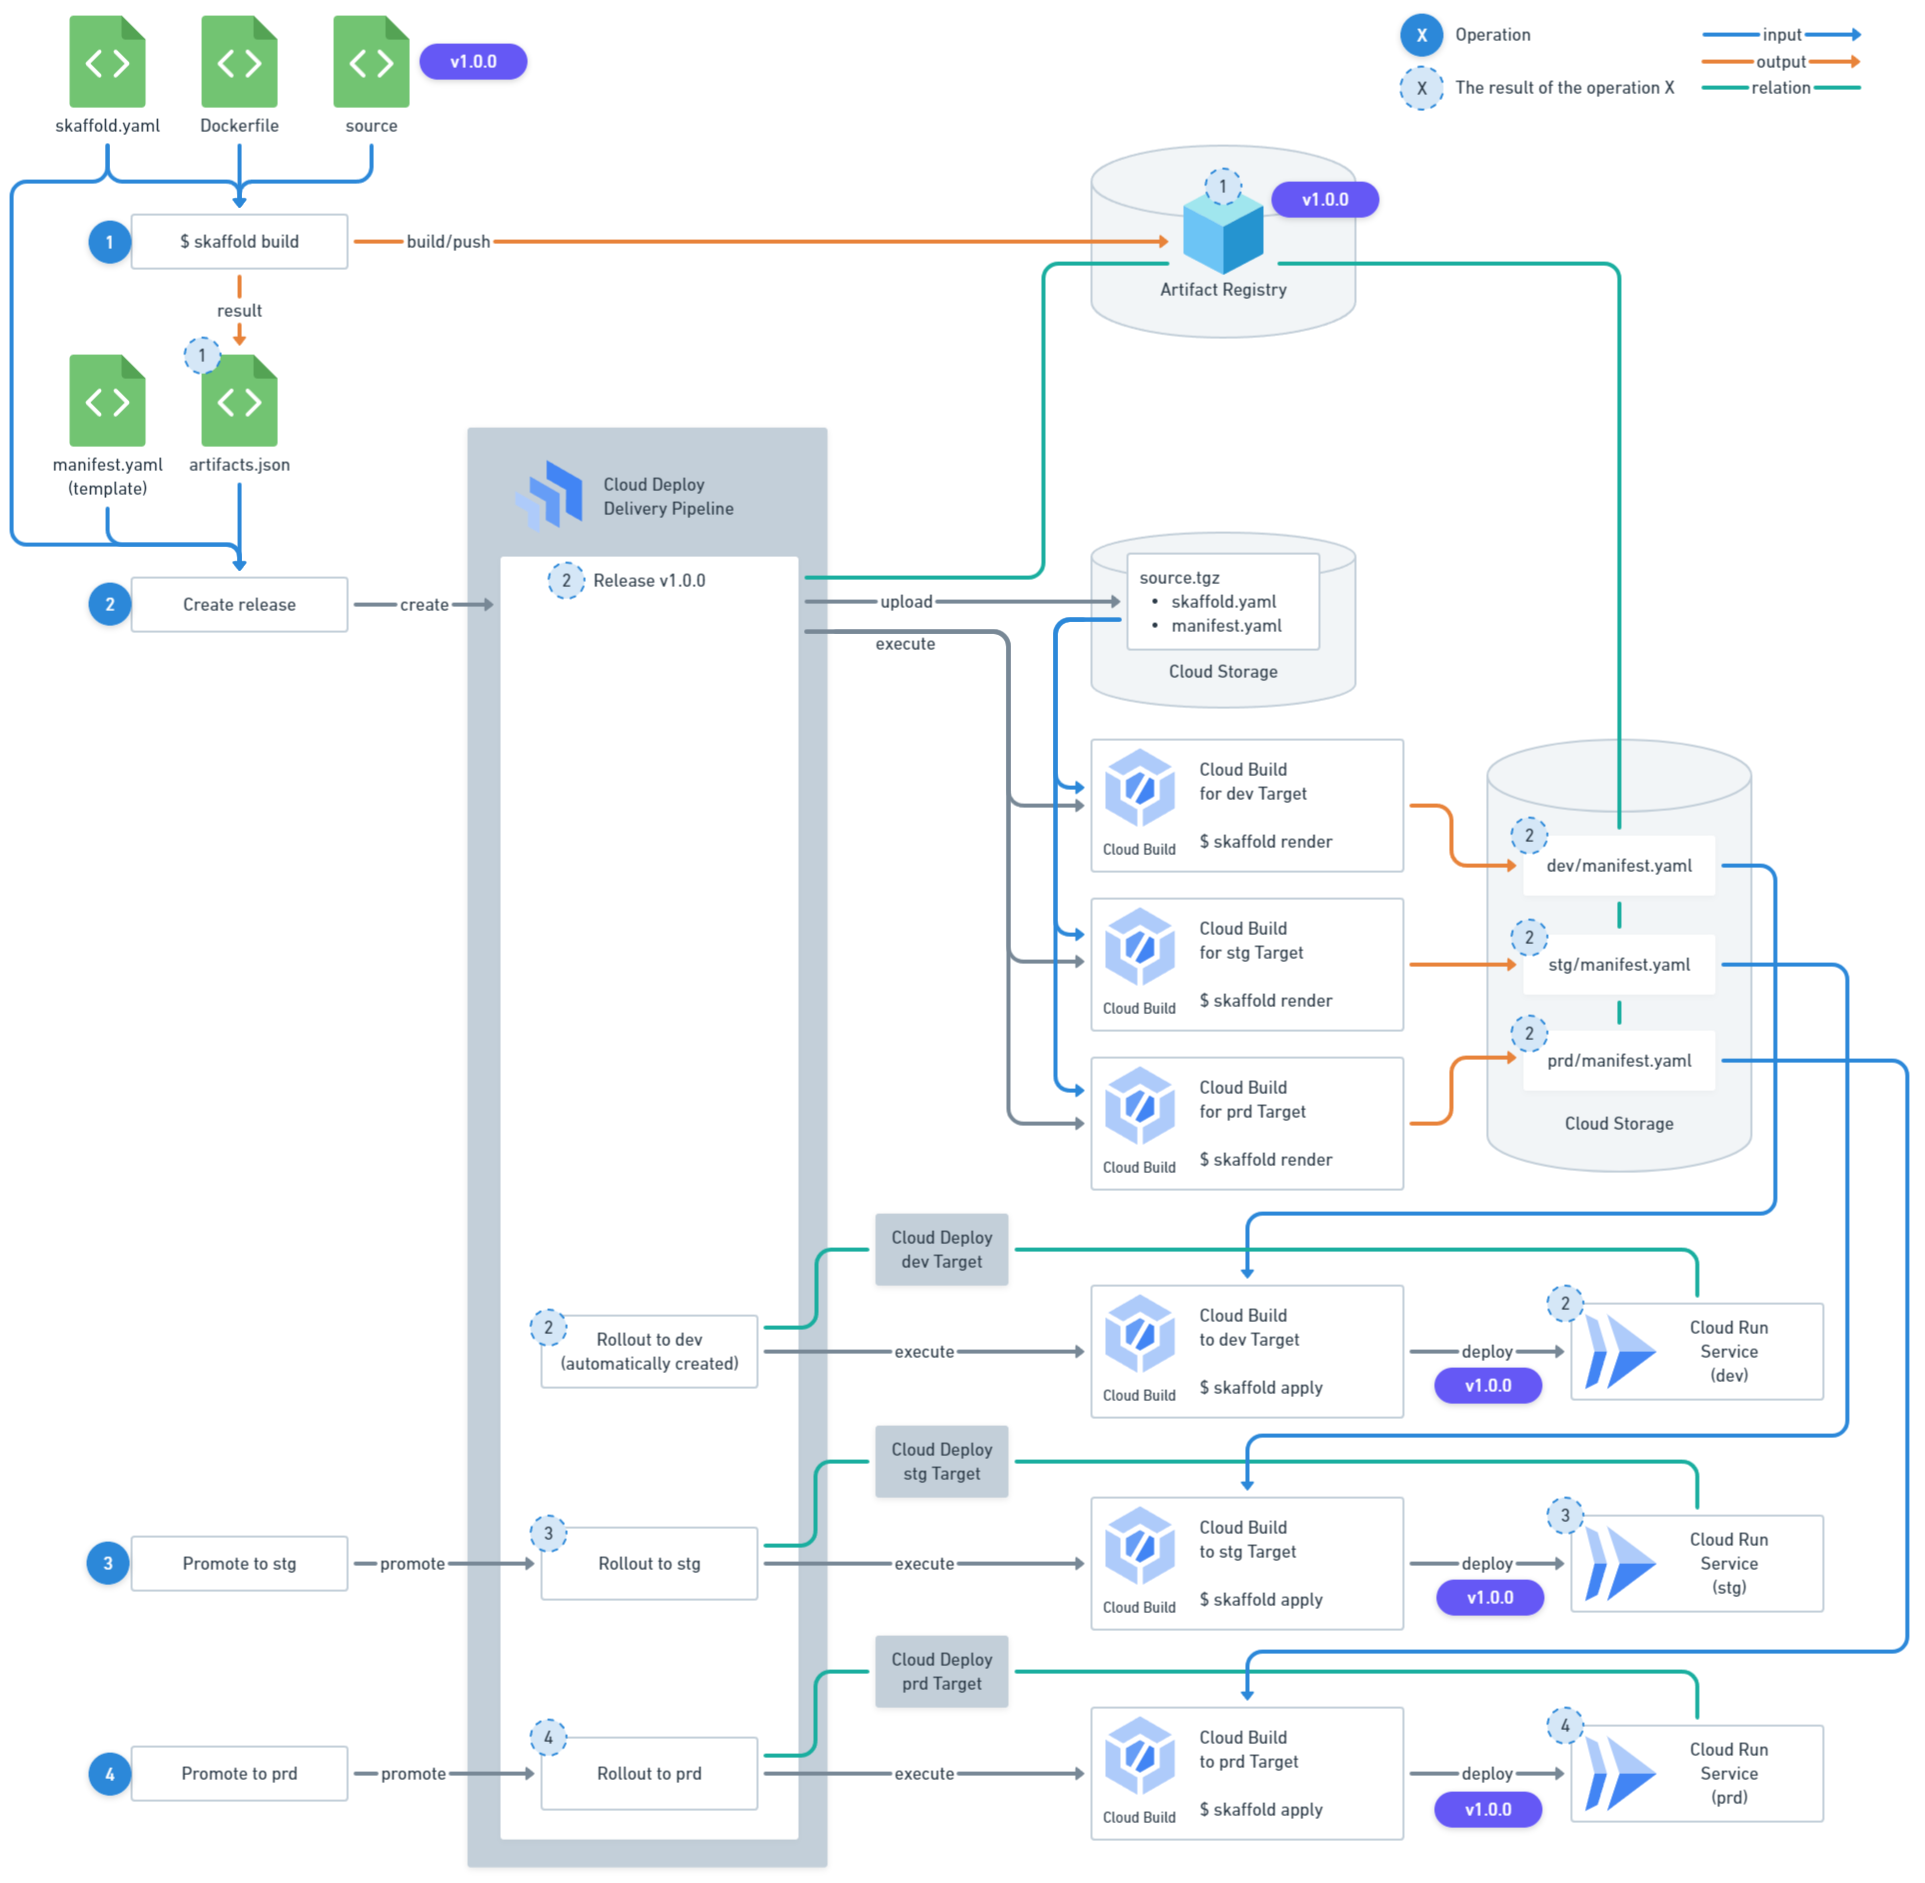 Overall deployment flow
Building a Delivery Pipeline
Now, let’s walk through building a dev → stg → prd deployment pipeline for a Cloud Run service app named hello-app, exploring Cloud Deploy’s mechanics, recommended setup practices, and design considerations.
Note that the Terraform code snippets in this article are abbreviated. Refer to the sample code for complete and functional examples.
Project Structure
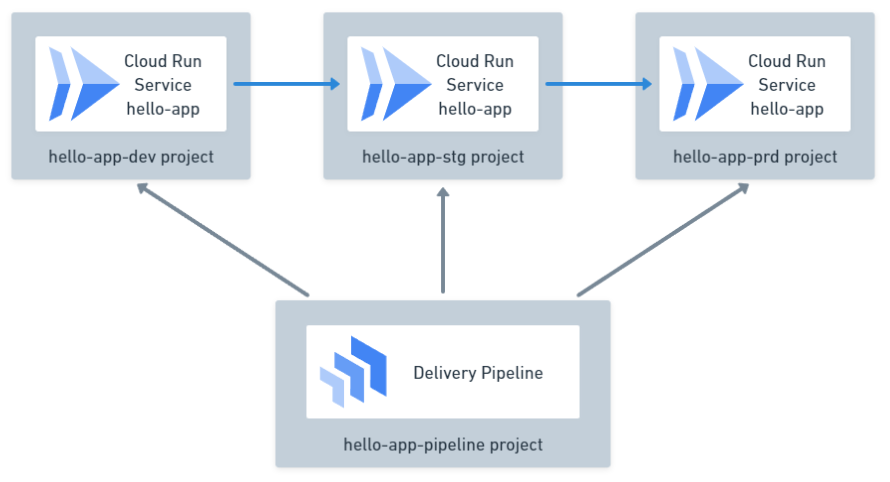
In Google Cloud, it’s best practice to separate projects for different environments. So, where should deployment resources like Delivery Pipelines reside? It’s recommended to create a dedicated pipeline project separate from the service projects.
Permission Design
Let’s consider the various actors (or Principals in Google Cloud terminology) involved in the Delivery Pipeline and their required permissions.
Principals
First, let’s identify the relevant Principals. The diagram below summarizes them:
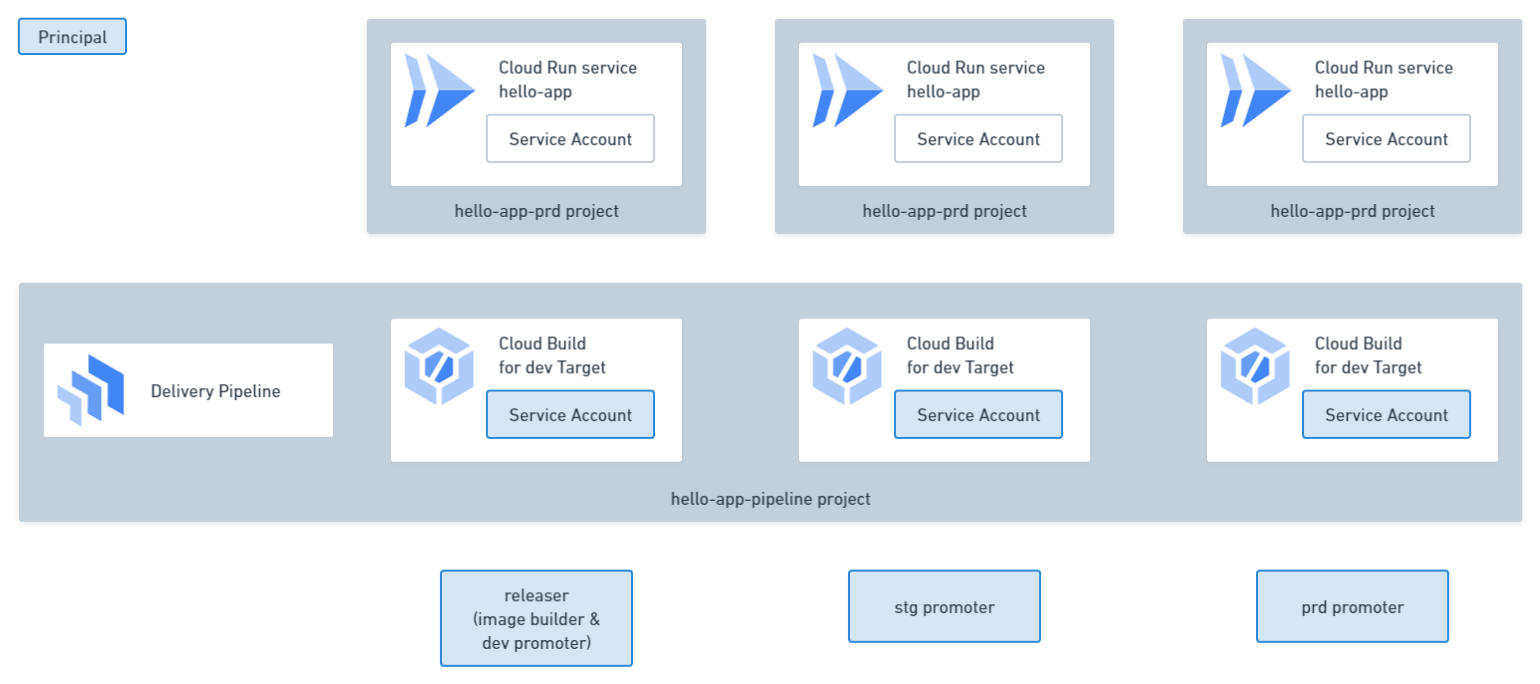
Here’s a brief description of their roles and responsibilities:
- releaser: Handles preparation and Release creation
- Runs
skaffold build(builds and pushes container image) - Runs
gcloud deploy releases create(creates Release) - This results in the creation of a dev Rollout
- Runs
- stg promoter: Creates the stg Rollout, running
gcloud deploy releases promote - prd promoter: Creates the prd Rollout, running
gcloud deploy releases promote - Cloud Build Service Account: Service Account for Cloud Build associated with each Target. Executes
skaffold renderandskaffold apply
Releaser Permissions
The releaser performs the following actions. The required roles or permissions for each action are listed alongside:
skaffold build- Builds the container image
- Pushes the container image (
roles/artifactregistry.writeron the Artifact Registry repository)
gcloud deploy releases create- Creates the Release (
clouddeploy.releases.createon the Delivery Pipeline)- Uploads
source.tgzto Cloud Storage (roles/storage.objectCreatorandroles/storage.legacyBucketReaderon the Cloud Storage bucket) - Triggers Cloud Build to run
skaffold renderfor each Target (roles/iam.serviceAccountUseron the Service Account configured for each Target)
- Uploads
- Creates the Rollout for dev (conditional
roles/clouddeploy.releaseron the Delivery Pipeline)- Triggers Cloud Build to run
skaffold applyfor the dev Target (roles/iam.serviceAccountUseron the Service Account configured for the dev Target)
- Triggers Cloud Build to run
- Retrieves asynchronous operations (Operations) (
roles/clouddeploy.vieweron the pipeline project)
- Creates the Release (
Additional Notes on Releaser Permissions
Read access to each Target is also required when creating a Rollout. In
this case, we need to grant roles/clouddeploy.viewer to the project to
retrieve Operations, which grants read access to all Targets, so it’s
omitted here.
Since the releaser’s actions are often automated through GitHub Workflows or Cloud Build triggered by source code changes, these permissions are typically assigned to the corresponding Service Account.
Here’s how to configure the permissions in Terraform when using a Service Account as the releaser:
resource "google_service_account" "hello-app-releaser" {  project    = google_project.pipeline.project_id  account_id = "hello-app-releaser"}
resource "google_artifact_registry_repository_iam_member" "hello-app-deployer" {  project    = google_artifact_registry_repository.hello-app.project  location   = google_artifact_registry_repository.hello-app.location  repository = google_artifact_registry_repository.hello-app.name  role       = "roles/artifactregistry.writer"  member     = "serviceAccount:${google_service_account.hello-app-releaser.email}"}
resource "google_storage_bucket_iam_member" "objectCreator" {  bucket = google_storage_bucket.storage.name  role   = "roles/storage.objectCreator"  member = "serviceAccount:${google_service_account.hello-app-releaser.email}"}
resource "google_storage_bucket_iam_member" "legacyBucketReader" {  bucket = google_storage_bucket.storage.name  role   = "roles/storage.legacyBucketReader"  member = "serviceAccount:${google_service_account.hello-app-releaser.email}"}
resource "google_service_account_iam_member" "serviceAccountUser" {  for_each = ["dev", "stg", "prd"]
  service_account_id = google_service_account.hello-app-target[each.key].name  role               = "roles/iam.serviceAccountUser"  member             = "serviceAccount:${google_service_account.hello-app-releaser.email}"}
resource "google_project_iam_custom_role" "clouddeployReleaseCreator" {  project     = google_project.pipeline.project_id  role_id     = "clouddeployReleaseCreator"  title       = "Cloud Deploy Release Creator"  permissions = ["clouddeploy.releases.create"]}
data "google_iam_policy" "hello-app-pipeline-policy" {  binding {    role    = google_project_iam_custom_role.clouddeployReleaseCreator.id    members = ["serviceAccount:${google_service_account.hello-app-releaser.email}"]  }
  binding {    role    = "roles/clouddeploy.releaser"    members = ["serviceAccount:${google_service_account.hello-app-releaser.email}"]    condition {      title      = "Rollout to hello-app-dev"      expression = "api.getAttribute(\"clouddeploy.googleapis.com/rolloutTarget\", \"\") == \"${google_clouddeploy_target.hello-app-target["dev"].name}\""    }  }
  // ...}
resource "google_clouddeploy_delivery_pipeline_iam_policy" "policy" {  project     = google_clouddeploy_delivery_pipeline.hello-app-pipeline.project  location    = google_clouddeploy_delivery_pipeline.hello-app-pipeline.location  name        = google_clouddeploy_delivery_pipeline.hello-app-pipeline.name  policy_data = data.google_iam_policy.hello-app-pipeline-policy.policy_data}
resource "google_project_iam_member" "hello-app-deployer_clouddeploy_viewer" {  project = google_project.pipeline.project_id  role    = "roles/clouddeploy.viewer"  member  = "serviceAccount:${google_service_account.hello-app-releaser.email}"}
Additional Notes on Releaser Permission Configuration
The Terraform configuration for releaser permissions appears complex, but
it’s necessary to prevent the releaser from deploying to stg and prd
environments. While the roles/clouddeploy.releaser role allows creating
Releases on the Delivery Pipeline, it also includes permission to create
Rollouts. Assigning it unconditionally to the Delivery Pipeline would
allow deployments to all Targets. Therefore, we create a custom role
specifically for Release creation. Additionally, we configure a condition
to restrict roles/clouddeploy.releaser to only apply to the dev
environment.
Cloud Build Service Account
The Service Account attached to Cloud Build instances launched by the Delivery Pipeline depends on the associated Target. For example, here’s the Terraform configuration for setting the Service Account for Cloud Build related to the dev Target:
resource "google_service_account" "hello-app-target-dev" {  project    = google_project.pipeline.project_id  account_id = "hello-app-target-dev"}
resource "google_clouddeploy_target" "hello-app-target-dev" {  project          = google_project.pipeline.project_id  location         = "us-west1"  name             = "hello-app-dev"  execution_configs {    service_account = google_service_account.hello-app-target-dev.email  }  run {    location = "projects/hello-app-dev/locations/us-west1"  }}
For each Target, Cloud Build is triggered twice: once during Release creation and again during Rollout creation. Here are the actions performed in each case and the required permissions:
skaffold render(triggered at Release creation)- Downloads
source.tgzfrom Cloud Storage (roles/storage.objectVieweron the Cloud Storage bucket) - Uploads
manifest.jsonto Cloud Storage (roles/storage.objectCreatoron the Cloud Storage bucket)
- Downloads
skaffold apply(triggered at Rollout creation)- Downloads
manifest.jsonfrom Cloud Storage (roles/storage.objectVieweron the Cloud Storage bucket) - Deploys the Cloud Run service (
roles/run.developeron the Cloud Run service androles/iam.serviceAccountUseron the Cloud Run service’s Service Account)
- Downloads
Additionally, the basic role roles/logging.logWriter is required for Cloud Build execution.
Here’s the Terraform configuration for setting the necessary permissions for the Cloud Build Service Account associated with the dev Target (similar configuration applies to stg and prd):
resource "google_service_account" "hello-app-target-dev" {  project    = google_project.pipeline.project_id  account_id = "hello-app-target-dev"}
resource "google_project_iam_member" "logWriter" {  project = google_project.pipeline.project_id  role    = "roles/logging.logWriter"  member  = "serviceAccount:${google_service_account.hello-app-target-dev.email}"}
resource "google_storage_bucket_iam_member" "objectViewer" {  bucket = google_storage_bucket.storage.name  role   = "roles/storage.objectViewer"  member = "serviceAccount:${google_service_account.hello-app-target-dev.email}"}
resource "google_storage_bucket_iam_member" "objectCreator" {  bucket = google_storage_bucket.storage.name  role   = "roles/storage.objectCreator"  member = "serviceAccount:${google_service_account.hello-app-target-dev.email}"}
resource "google_service_account_iam_member" "serviceAccountUser" {  service_account_id = google_service_account.hello-app-dev.name  role               = "roles/iam.serviceAccountUser"  member             = "serviceAccount:${google_service_account.hello-app-target-dev.email}"}
resource "google_cloud_run_v2_service_iam_member" "hello-app-target_run_developer" {  project  = google_cloud_run_v2_service.hello-app-dev.project  location = google_cloud_run_v2_service.hello-app-dev.location  name     = google_cloud_run_v2_service.hello-app-dev.name  role     = "roles/run.developer"  member   = "serviceAccount:${google_service_account.hello-app-target-dev.email}"}
Additional Notes on Cloud Build Service Account Permissions
By default, Cloud Deploy uses separate Cloud Storage buckets for the
source.tgz and manifest.json files. This necessitates permission
configuration for both buckets. If using the same bucket is acceptable for
your use case, it’s recommended to simplify the setup by doing so.
stg and prd Promoters
The stg promoter performs the following actions (same applies to the prd promoter):
gcloud deploy releases promote- Creates the Rollout for stg (conditional
roles/clouddeploy.releaserfor the Delivery Pipeline)- Triggers Cloud Build to run
skaffold applyfor the stg Target (roles/iam.serviceAccountUserfor the Service Account configured for the stg Target)
- Triggers Cloud Build to run
- Retrieves asynchronous operations (Operations) (
roles/clouddeploy.viewerfor the pipeline project)
- Creates the Rollout for stg (conditional
Promoters are typically SREs or automated systems triggered by events or individuals.
Here’s the Terraform configuration for setting permissions when implementing the stg promoter as a Service Account (similar configuration applies to the prd promoter):
resource "google_service_account" "hello-app-stg-promoter" {  project    = google_project.pipeline.project_id  account_id = "hello-app-stg-promoter"}
resource "google_service_account_iam_member" "serviceAccountUser" {  service_account_id = google_service_account.hello-app-target["stg"].name  role               = "roles/iam.serviceAccountUser"  member             = "serviceAccount:${google_service_account.hello-app-stg-promoter.email}"}
data "google_iam_policy" "hello-app-policy" {  // ...
  binding {    role    = "roles/clouddeploy.releaser"    members = ["serviceAccount:${google_service_account.hello-app-stg-promoter.email}"]    condition {      title      = "Rollout to hello-app-stg"      expression = "api.getAttribute(\"clouddeploy.googleapis.com/rolloutTarget\", \"\") == \"${google_clouddeploy_target.hello-app-stg.name}\""    }  }
  // ...}
resource "google_clouddeploy_delivery_pipeline_iam_policy" "policy" {  project     = google_clouddeploy_delivery_pipeline.hello-app.project  location    = google_clouddeploy_delivery_pipeline.hello-app.location  name        = google_clouddeploy_delivery_pipeline.hello-app.name  policy_data = data.google_iam_policy.hello-app-policy.policy_data}
resource "google_project_iam_member" "clouddeploy_viewer" {  project = google_project.pipeline.project_id  role    = "roles/clouddeploy.viewer"  member  = "serviceAccount:${google_service_account.hello-app-stg-promoter.email}",}
Building the Delivery Pipeline
While many official Cloud Deploy documents and articles suggest defining the Delivery Pipeline in YAML, it’s entirely unnecessary. Manage it using your preferred method, such as Terraform.
In Terraform, use the google_clouddeploy_delivery_pipeline resource like this:
resource "google_clouddeploy_delivery_pipeline" "hello-app-pipeline" { location = "us-west1" name = "hello-app-pipeline" serial_pipeline { stages { target_id = google_clouddeploy_target.hello-app-dev.name } stages { target_id = google_clouddeploy_target.hello-app-stg.name } stages { target_id = google_clouddeploy_target.hello-app-prd.name } }}The location is independent of the deployment target location.
Many documents and samples configure profiles for each stage, but this is not required. Especially for Cloud Run, omitting them leads to a simpler and clearer configuration.
manifest.yaml
The manifest.yaml is the Cloud Run service YAML. While not necessary for basic Cloud Run usage, it’s required for Cloud Deploy.
If you’re already using Cloud Run, you can find this YAML in the console or retrieve it using the following command. Copy it and remove unnecessary elements while referring to the reference.
gcloud run services describe hello-app \ --region us-central1 \ --format yamlYou only need one manifest.yaml for your Cloud Run service app (no need for separate ones for dev, stg, and prd). Here’s a basic example:
apiVersion: serving.knative.dev/v1kind: Servicemetadata: name: hello-app annotations: run.googleapis.com/ingress: allspec: template: spec: serviceAccountName: dummy # from-param: ${service_account_name} containers: - name: hello-app image: hello-app env: - name: MESSAGE value: dummy # from-param: ${message}Notice the comments like # from-param: ${service_account_name}. These are significant. Parameters set with # from-param: are called deploy parameters. Since deploy parameters can be configured per Target, they’re useful for values that vary across environments.
For instance, with the above YAML, Cloud Deploy will replace the following values before deploying to each environment:
- dev environment
serviceAccountName:dummy→hello-app@hello-app-dev.iam.gserviceaccount.comenv[0].value:dummy→Hello, dev!
- stg environment
serviceAccountName:dummy→hello-app@hello-app-stg.iam.gserviceaccount.comenv[0].value:dummy→Hello, stg!
- prd environment
serviceAccountName:dummy→hello-app@hello-app-prd.iam.gserviceaccount.comenv[0].value:dummy→Hello, prd!
Additional Notes on manifest.yaml Rendering
This article recommends deploy parameters for their simplicity, ease of
learning, and manageability with Terraform. However, if your
manifest.yaml becomes complex, rendering it with just deploy parameters
might become challenging. In such cases, Cloud Deploy supports Helm,
Kustomize, and kpt, so consider utilizing these rendering
tools
.
Target
Cloud Deploy Targets, like Delivery Pipelines, should be built using Terraform or similar tools. In Terraform, use the google_clouddeploy_target resource.
resource "google_clouddeploy_target" "hello-app-dev" {  location         = "us-west1"  name             = "hello-app-dev"
  execution_configs {    usages           = ["RENDER", "DEPLOY"]    service_account  = google_service_account.hello-app-target-dev.email    artifact_storage = "gs://${google_storage_bucket.storage.name}/artifacts"  }
  run {    location = "projects/hello-app-dev/locations/us-west1"  }
  deploy_parameters = {    message              = "Hello, dev!"    service_account_name = google_service_account.hello-app-dev.email  }}
The location needs to be the same as the Delivery Pipeline location, not the Cloud Run deployment location.
Deploy parameters discussed in the manifest.yaml section are configured here.
skaffold.yaml
The skaffold.yaml file defines the configuration for the skaffold build, skaffold render, and skaffold apply commands mentioned earlier.
skaffold build- Container image tag naming convention
- Container image name
- Container image build configuration
skaffold render- Path to
manifest.yaml
- Path to
skaffold apply- No specific configuration (just boilerplate)
Here’s an example skaffold.yaml with these configurations:
apiVersion: skaffold/v3kind: Configmetadata: name: hello-appbuild: tagPolicy: envTemplate: template: "{{ .APP_VERSION }}" artifacts: - image: hello-app context: ../../app docker: buildArgs: app_version: "{{ .APP_VERSION }}" dockerfile: ../../app/Dockerfile local: useBuildkit: true push: truedeploy: cloudrun: {}manifests: rawYaml: - manifest.yamlFor detailed explanations, refer to the skaffold.yaml reference. Here’s a brief overview of the essential elements:
build.tagPolicy: Defines how container image tags are named. The example usesenvTemplate, which sets the tag based on the value of theAPP_VERSIONenvironment variable duringskaffold build. Other options includegitCommit, which automatically sets tags based on Git commits. See the documentation for details.build.artifacts[].image: The name of the container image. In themanifest.yaml, any image matching this name will be replaced with the actual built container image.build.artifacts[].context: The context for runningdocker build.build.artifacts[].docker: Configuration fordocker build.manifests.rawYaml: Specifies the path to themanifest.yamlfile.
Directory Structure
It’s convenient to keep skaffold.yaml and manifest.yaml together in their own directory. This allows you to run commands like skaffold build and gcloud deploy releases create from within that directory for smooth operation.
.├── app│ ├── Dockerfile│ ├── go.mod│ ├── go.sum│ └── main.go├── deploy│ ├── manifest.yaml│ └── skaffold.yaml└── terraform ├── pipeline.tf ├── service.tf ├── variables.tf └── versions.tfConclusion
Cloud Deploy may appear complex at first, but don’t let that deter you! By grasping the concepts and processes outlined in this guide, you’ll be well-equipped to build and manage robust, automated deployment pipelines for your Cloud Run applications. With Cloud Deploy in your arsenal, you can streamline your workflow, accelerate deployments, and focus on what matters most: innovating and delivering exceptional applications. So, embrace the power of Cloud Deploy and take your Cloud Run deployments to the next level! 🚀✨